
Step 3: Upgrade Buttons and Inputs 1.0
In this step you’ll change many of the controls in the app, using these components:
<material-toggle><material-fab><material-checkbox>-
<material-radio>and<material-radio-group>
These controls appear in two custom components: <lottery-simulator> and
<settings-component>.
Run the live example (view source) of the `` version of the app.
Use material-toggle
-
Make the following changes to
lib/lottery_simulator.dart: -
Edit
lib/lottery_simulator.htmlto convert the “Go faster”<div>(and its children) into a<material-toggle>(MaterialToggleComponent), as the following diff shows:
Here’s the resulting UI:

The class behind <material-toggle>,
MaterialToggleComponent,
defines label and checked attributes.
The label attribute contains the main text for the toggle,
which the app previously specified in the <label> element.
A two-way binding to the checked property simplifies setting the
toggle’s state.
Use material-fab
Now convert the buttons that have icons into floating action buttons (FABs).
-
Edit
lib/lottery_simulator.html. -
Convert the Play button from a
<button>to a<material-fab>(MaterialFabComponent), adding theraisedattribute and changing(click)to(trigger): -
Convert the remaining three buttons in the same way, but add the
miniattribute. For example:
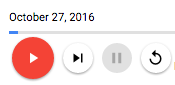
Once you’re done, run the app and play with the buttons. They look good, and they have a nice ripple animation when you click them.
Use material-checkbox
The primary UI is looking good!
Now start improving the settings section of the UI,
which is implemented in lib/src/settings/settings_component.* files.
First, change the checkbox to use <material-checkbox> (MaterialCheckboxComponent).
-
Make the following changes to the Dart file for
<settings-component>(lib/src/settings/settings_component.dart): -
Edit the template file (
lib/src/settings/settings_component.html), changing the “checkbox” input and its surrounding label into a<material-checkbox>.
Look how much simpler that code is!
MaterialCheckboxComponent supports a label attribute and
two-way binding to checked, enabling much cleaner HTML.
Use material-radio and material-radio-group
Still working on the settings, convert radio buttons
into <material-radio> components. Each group of radio buttons
is contained by a <material-radio-group> (MaterialRadioComponent).
-
Edit the Dart file for
<settings-component>(lib/src/settings/settings_component.dart) to register MaterialRadioComponent and MaterialRadioGroupComponent: -
In the template file (
lib/src/settings/settings_component.html), find the string"radio". Change the enclosing label to<material-radio>, and then the immediately enclosing<div>to<material-radio-group>. -
Move the input’s
[checked]and(click)code into the material-radio component. If the input has[disabled]code, move that too. -
Change
(click)to(checkedChange), andcurrent.checkedto$event. Here’s why: MaterialRadioComponent fires checkedChange when the radio button’s selection state changes. The event’s value is true if the radio button has become selected, and otherwise false. -
Remove the
<input>tag. Your code changes should look like this: -
Repeat the process for the remaining radio button groups.
-
Run the app. You might notice a small problem with the appearance of the Strategy settings:
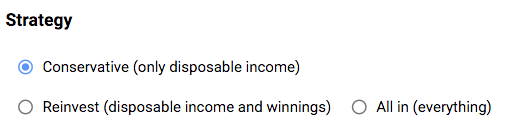
-
Fix the appearance problem by editing
lib/src/settings/settings_component.cssto add a rule that maximizes that component’s width:
The app is now much better looking, but it still displays too much information. You’ll fix that in the next step.
Problems?
Check your code against the solution in the 3-usebuttons directory.